Fred's Fairing Fantasy
This page contains the ongoing story of my endeavor to take my plain vanilla 1989
GS500E and 'dress it up' to like its big brother GSX-R. Selecton
the list below to pick the part of the story you want to read. Pleasenote
that I share my experiences here solely to document what challenges I have
encountered. There is no guarantee that if you make some of the same
choices, that your experiences will be better or worse, the same or different.
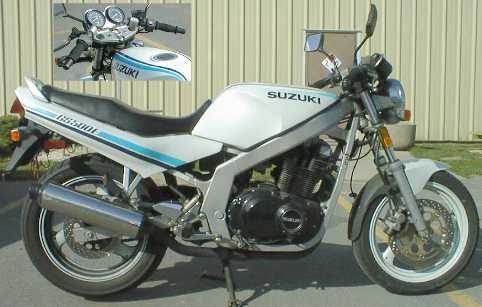
As it looked when I bought it...(back to top)

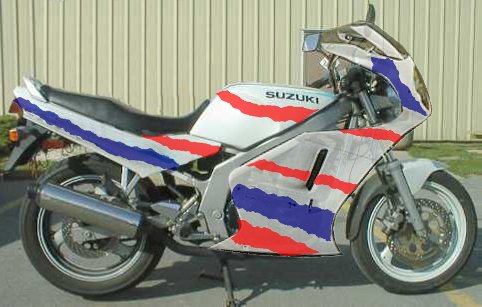
...and what it looks like with my new fairing on (FINALLY!!)
[click this picture above to go to the AirTECH webpage.]
...and a few virtual decals until I get the pieces back from the paintshop.
(back to top)
...and then, me playing with the idea of graphics from
www.tapeworks.com!
...and if you have Euro-access (no USA distributors to date), checkout
the GS500E fairings available at www.tcpsa.com.(TCPhas
been messing with their pages, good luck!)
also, SpecII (www.spec2.com)
has one, but I don't know anything about it.
(back to top)
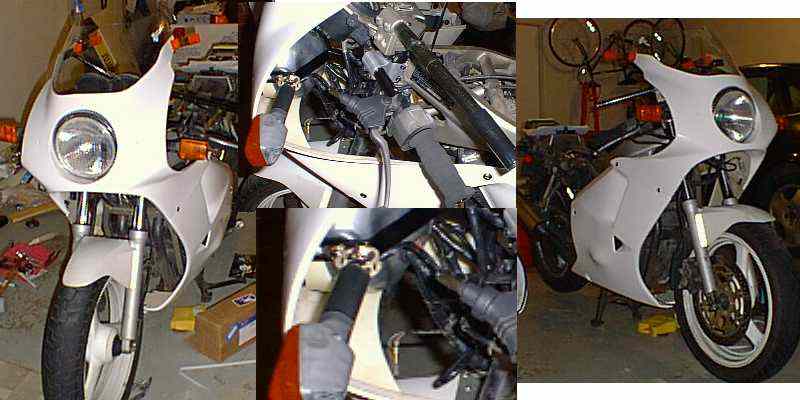
...and here are some other pre-paint shots giving a front view sans tank
and seat/solo-cover, a look at the old vs. new handlebars (centertop) and
how I am trying to continue to use the OEM turn signals attached to the
headlight bracket (center bottom).
(back to top)
THE STORY BEHIND IT ALL
To start, I got my bike at the end of the summer of '97, and it was quitea
step up from my old Honda CM450E. After enough cold mornings, I decided
I needed a fairing. I decided to spend the money I got for the Honda on
a fairing, and decided that a full faring was the way I wanted to go.
I had found the AirTECH for a little more than the Honda brought,and Suzuki
wanted 450US$ for just a 1/2 fairing which seemed steep.
The first fairing body work I received in the summer of '98 was shoddy to
say the least. It had little blue paper stickers that said "Made in
Mexico", instead of the signed laminated in the resin labels advertised on
their page.
" LaminateTags
Don't be fooled by cheap imitations.
Look for this tag in your parts. Our craftsman take great pride in their
work and sign every panel they make. This tag also aids us in tracking the
performance of new materials. If your panel doesn't have this tag you didn't
get the best."
|
(Editorial Note: On the AirTech/KentRiches
home pages, you will find what they call "DeadbeatDudes"
whom they claim have stiffed them. This page is not meant to deride
AirTech in the fashion that they have attacked those they list,it is meant
only to assist future AirTech Titan Kit customers in their dealings with
Kent and his organization.)
The edges of the head light cut out where a series of flat edges instead of
a round oval/circle. I learned that I was going to have to drill my
own holes, but the 'détente' where the drill holes were to go were
usually so filled with gel coat that I couldn't find them. The windscreen
was left out of the first shipment, and the bag of hardware was woefully
lacking sufficient parts to complete a finished assembly. The instructions
are an extreme challenge to comprehend, that is once I got them to mail
me a set. The plexiglas cover that is supposed cover the headlight
is no longer included, even though it is in all of there advertised text.
But this was all for the most part fixable...
In the process of trying figure out how much hardware was missing, I tried
clamping up the 3 main pieces. No matter what I did, I couldn't get
the "Upper" center body work piece's lower edge to extend any where near
the length of the top adjoining edge of either of the two "Side" lowers' top
edges. I sent it back with pictures to Kent. AirTECH made me
a new fairing upper, vastly improved in quality at the edges, the headlight cutout,
and gel coat finish quality, including a new laminated tag signed as advertised.
However the same length problem was there and would not go away. The
skinny of it all is that the mold for the upper has been getting 'trimmed'
along with the numerous fairing uppers made over the last 10 years.
The options were to fix the mold (to which Kent refused) or to fix the part.
If you read this far you know that the part is fixed. But caveat
emptor if you are in the market for a fairing. If you buy one
from AirTECH, make sure you get a personal assurance from Kent Riches that
he will make sure the trailing lower edge of the Upper fits flush with the
lower, before you send him the payment. These issues have to be balanced
if you consider getting one of the plastic alternatives. A plastic
fairing costs a good bit more, most likely will have its own challenges,
although the fit should be more consistent due to repeatable manufacturing
techniques,and the paint job should not be an issue. The Moral is, no fairing
installation will be totally easy nor very cheap, so regardless what you
it will become a 'labor of love' (as a bike will always be!). (back
totop)
16 June 2000 Update:
I finished installing the painted bodywork and tank, poured in some gas, no
big leaks...and I went for a ride!!!! The next day my wife informs me
that the garage stinks of gas. I check the lines...dry! Then I notice
at the low point (middle of the side, opposite of the petcock) the paint
has bubbled and it is wet, GAS! The bondo nearby tells me the painter
fixed something, and pentrated through, probably due to rust. I believe
this, as I had to do major flushing of rust and other debris prior to reinstallation
of the tank. To top it off, the light behind the speedo is out,
which may be I messed up the wiring or the bulb died (more work to do either
way). Today I went and bought a savlage tank for 100$US in good condition,
but it is Orange (my wifecalls it bright red). This will do until
either I paint the new one or fix the old one.
My test ride taught me something else. Based on how I typically position
my left foot, my left shin hits the fairing at it rear most point. I guess
I will have to learn to shift with my foot dropped back an inch, or develop
a major callous on my shin! Otherwise....I CAN'T WAIT TO RIDE!!!
(back to top)
28 May 2000 Update:
I finished installing the bodywork, and the hardest thing is that I had to
take it all off to get it painted. I briefly considered painting it
myself, but quickly decided I'd probably be another two months before I
could be done! for 350$US I found body shop guy who is painting a
near original white pearl finish on the tank, the three main bodywork pieces
and the solo seat cover (including stripping and prepping the tank!). I've
bought 100$US of decals from DennisKirk
in roughly the original Blue and purple trim colors. Plus,I have
found that as they did when I was a kid, vendors send you decals for free,
so I'm gonna have a bit of that racing bike look too!. Finally, with some
creative use of pinstripe, I'm going to have one BigS bike! (you'll see
what I mean soon enough). (backto top)
Back to the installation process! Here is a laundry list of the challenges
I have experienced since I first started disassembly for installation:(not
necessarily in order)
-
Clip-ons from Air-Tech vs. Pro-Flo: When I first purchased the kit, AirTech
sold me a set of simple clip on handlebars, which are necessary due to the
fairing shape which requires lowered bars. The '89 has pseudo clip
ons that must be replaced (as opposed to using clubman bars on the later
models). Two years later when I finally go to install the pair sold
to me, I couldn't fit them on. The lesson learned was that AirTech
believed you could fit 36mm clip-ons around 37mm fork tubes, which is not
the proper thing to do! If I really stretched and stressed the mounts,
they went over the tubes, then the bolts were too short. (and this was
only after a second pair was sent by Kent, which was nice of him to do,
even though...) I sent both pair back to Kent/AirTech, and to date
I have yet to get a refund...but this is only a part of the picture (Ed.
Note: Perhaps I should have a deadbeat page for the 60+$US he owes me for
the bars, but he'd probably claim an exchange for the soloseat cover and
front fender he threw in the last shipment which at his list are worth more,
although the seat cover was not signed, and the fender was also made in
"Mexico". The alternative I took was to buy a pair of Pro-Flo
bars which cost 40$US more than Kent's one piece weldment bars, and 40$US
less than the equivalent Vector bars of similar construction. The
Pro-Flow bars are about 2" longer and they are counterbored to accept standard
bar ends (availablefrom Dennis Kirk
and others)
-
Mounting the center bracket in front of the tank: There is big
"Y" shaped bracket that attaches to the frame under the front of the tank,
and then it supports the mirrors at the top most points of the upper fairing..
Problem One - the holes in the frame were set wider than the holes on the
bracket, requiring me to 'slot' the bracket holes to match. Problem Two
- the bolts were 25 mm or so long, but there is a big (1"dia) tube that
is welded from side to side of the frame directly under these mount
holes which made it nearly impossible to install the bolts. I had to cut
the bolts almost in half, twist like a pretzel to hold the nuts in place,
and tape them into a needle nose pliers to boot. Neither of these
were insurmountable, just annoying.
-
Attaching the Upper bodywork to the Headlight bracket: Yet another large
"Y" shaped bracket with a U-bolt interface supports the Upper and provide
mount points for the headlight. The tips of the "Y" are bent back
to mate with the bodywork. Challenge One - it was not at all clear
how to install this, and of course my first attempt was upside down(and
getting the u-bolt on and off the steering column is quite a challenge).Problem
One - the bends of the "Y" were not symmetrical, which provided much more
challenge to fitting the Upper than I had hoped. Caveat to be careful
while rebending, not to twist 'out of plane'! Problem Two - the bent
back tips did not lay up with the angle of the body work before or after
the first bend job, providing the opportunity to bend again bringing the
flanges flush to the fiberglas. I should also note here that you should
you be working on the headlight, REMOVE THE BULB! (another10$US, what the
he**). even with what rebending I could do, some inherent asymmetry
remains, and the headlight has to sit slightly crooked in the bracket in
order to be plumb with the bike axis.
-
Balanced attachment of the windscreen versus unequal curves behind the mirror
mounts: As is described elsewhere, the trimmed edges ofthe Upper
caused me great consternation. Well, I paid such attention to the
lower 'points' because they interfaced with the lowers, that I didn't pay
enough attention to the top most points just behind where the mirrors mount.
With some creative positioning of the windscreen, having to ignore some
predrilled holes, I was able to make the windscreen fit up 'OK'. I am sure
no one else would notice unless it was pointed out, but one end is quarter-round
finished, and one comes to a point! It will look right in the end,
but this was yet another 'challenge' that I had not expected from what I
had expected and hoped to be a well built kit.
-
Headlight ring fit and installation: The advertising for the kit
spoke of a plastic cover for the light. Air-Tech has removed this
from the kit without 'notice', but it is just as well, as it was extremely challenging
to get the headlight cowl/ring attached inside the Upper (plus in my setup,
the headlight protrudes just the slightest bit, possibly due to mount problems
describes elsewhere, so I couldn't have used it anyway). First, even though
the hole dimples are at 12, 3, 6, and 9 (on the clock),I'd suggest drilling
rotating the pattern 45 degrees to facilitate bolting it on. Plus
the ring was just a bit too small, so I snapped (cut)it at the top,
which is totally out of view anyway, to facilitate installation.
These are just the ones worth mentioning. Hopefully sometime in June/July'00
I will have a better update with the finished product. Checkback
then...FYR (back to top)
07 March 2000 Update:
I finally broke down to and have started putting on my fairing. I was stumped when
I found that I couldn't get the clip-on handle bars to fit the forks. I
sent a fax to Kent Riches at AirTech who called me back almost immediately, and
offered to replace the clip-on's two years later! He was a little dismayed at
the depth of detail that I have provide here related to my fairing experience. What
I tried to convince him, and would want you the reader to know, is that
I want to have the satisfaction and pleasure of having this fairing on my
bike. Kent wanted me to know, that he has sold thousands of pieces of bodywork
and Kits, and no one has had the experience that I have, although perhaps
I am a particular kind of customer. As a vendor, I must admit that he and
AirTech have been very willing to stand behind their product, and that they
have done more to attain my satisfaction then most vendors might. This is
an intangible you don't find as line item in the price tag. More as it develops...FYR
(back to top)
17 September 1999 Update:
Today I received the reworked center section from Kent Riches and his folks at
AirTECH. Yes this was 6-7 months after I thought he was going to be
able to turn around the repair. Regardless of the cause, the lower
edges have been extended to more closely match the length of the mating
edges of the lowers, and the heavy resin build up inside the front edges
has been reduced. You can see where the work is done from the outside
for now, but hopefully when I paint, that will go away.
To try to mollify me, and by way of an apology, Kent has thrown in a Solo
Seat cover, a front fender, and another set of LED turn signals. The seat
cover will require a cutout to accommodate the brake light in the center
back. Installation of the front fender is not intuitively obvious,
so I will have to see if they have an instruction sheet and if there is
extra hardware required.
The worst part is that I don't want to take the bike out of commission long
enough to install the fairing! More Updates as time permits.(back to
top)
OTHER GS500E LINKS
My other page with
pictures of the red temp tank, plus the 89-98 color listing
Sindarion Memorial
Page - http://www.rz.uni-frankfurt.de/~bialojah/GS500E.html
RuiPereira's
Suzuki GS500E - http://www.geocities.com/SiliconValley/Lakes/3611/gs500e.html
GSTwins page c/o John-
http://www.gs-twins.com/bikes/
Eurospares GSTwinPage
- http://www.eurospares.com/gspage.htm
GSTwin Mail List Instructions
- http://www.eurospares.com/maillist.htm
(back to
FYR's home page) (back to top)
Page history
http://members.aol.com/fyrftd/gs500e.htm & http://www.geocities.com/fyrftd/gs500e.htm
This Suzuki Motorcycle
Ring site owned by fred robinson.
[ Previous
5 Sites | Previous
| Next
| Next
5 Sites | Random
Site | List
Sites ]